How to: Backup Music from iPod to PC, save iPod music without other software - Mp4 Converter
Jack was in very low mood for he carelessly deleted his music existing on his iPod, that was his only copy, what should he do?
Well, many of us have come across such problems, here I kindly remind everybody to make backup for your files, because hard disk may melt up, computers may doesn't work, iPod may missing, it's very necessary to backup your important files. To be worst, there must be a way to save the iPod music. Here, I'm introducing a good way to backup your music on iPod to your computer.
Before we start, I recommend you download and install below software: iPod to computer transfer or iPodConvert for Mac, for both Windows and Mac, good for your cooperation. But there is another way which don't need any iPod backup software. And two things need to know. Firstly, this method can be only used for Windows iPod or iPod sync with Windows.Secondly, if you want to copy music bought from iTunes Music Store, the computer you are copying to has to have the same account on it in order to play the protected music.
Now, ready? Let's roll.
Step 1, Enable your iPod to be used as External Drive
Connect iPod with any computer, then iTunes will start up. Right click your iPod and select iPod options, You'll start out in the iPod/Music section, which is right where you want to be. Near the bottom of the screen, check the Enable Disk Use box if it isn't already checked. In this case, your computer can read the folders in iPod.
Step 2, Connect the Destination Computer with iPod
Via a Firewire or USB cable to connect your iPod with destination computer, ignore iTunes if it starts, we don't need it.
Step 3, Navigate to your iPod in Windows
Click Start menu, then choose My Computer. After iPod connected with PC, you'll see it available in Removable Devices in My Computer.

Step 4, View Files stored in iPod
Double click iPod, open it.
Step 5, Enable View Hidden Folders function

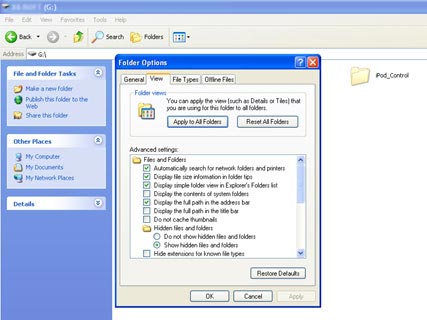
In the iPod folder, click "Tools" on the above of this window, choose "Folder Options" and click the "View" tab. You'll see a bunch of advanced settings for how Windows displays file information. In the "Hidden files and folders" section, select "Show hidden files and folders," then click OK.
Step 6, the Most Important Step
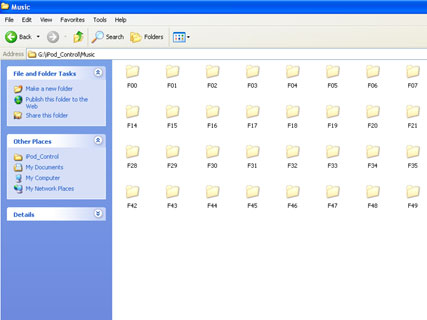
Here's neck of the bottle. In the iPod folder, you'll now see a few new, half-grayed-out folders. Double-click the one called iPod_Control. Then double-click the Music folder. See all of those numbered folders in there? Each one contains between 40 and 60 or so of your iPod's songs.

If you're looking for specific songs or don't mind grabbing all of these folders, you can probably take it from here; just copy and paste or drag the songs into a folder on your computer. But there's a better way--keep reading.
Step 7, Found a destination folder
Found a destination folder where you want to save your music.
Step 8, Search for all music on the iPod
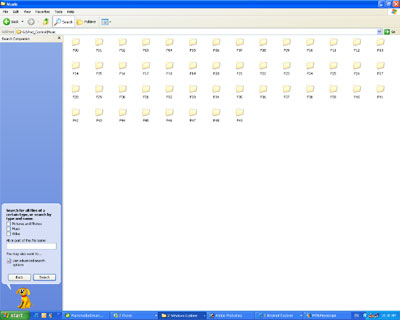
Click the Search button at the top of the iPod's Music folder. The Search column will appear in the left side of the window. Make sure that "Search for files and folders" appear at the top of this column; if not, click the underlined phrase "Files and folders" at the bottom of the column. Do not enter any text into the two search boxes, but be sure to select your iPod in the Look In drop-down menu. Then expand the Advanced Options section and check the box for "Search hidden files and subfolders." Click Search Now.

Step 9, Search by type
You'll see a whole bunch of search results, but don't be alarmed. Click "Type" at the top of the file-type column, just to the right of Size. Now, you can see all of the iPod's music in chunks, separated by file type. Select the top song you want, then scroll down, hold the Shift key, and select the bottom one you want.
Step 10, Copy the Music
After you selected the music , drag and drop or copy and paste it into the new folder you created in step 7. Just sit back as the music flows from iPod to PC. Before you close your iPod window, uncheck Advanced Options so that you turn off the View Hidden Folders option. That preference can cause unsightly clutter in your non-iPod folders.
Now, that's it!
Featured Guides
Guides Categories
Video/Audio Guides
- 4Media Audio Converter Pro Tutorial
- 4Media Movie Editor 6 Tutorial
- Video Converter Ultimate Tutorial
- How to convert DAT to other videos
DVD/CD/Blu-Ray Guides
- 4Media Blu Ray Converter for Mac Tutorial
- How to convert Blu-ray disc to video files
- How to burn AVI, MPEG, VOB, DAT, M2V, MPG to DVD on Mac
- How to burn DivX to DVD on Mac
iPod Guides
- 4Media iPod Max Guide
- How to convert AVI, MPEG to iPod MP4 format
- Guide: 4Media iPod to PC Transfer
- How to convert DVD to iPod on Mac
iPhone Guides
- 4Media iPhone Contacts Transfer for Mac Tutorial
- 4Media iPhone Contacts Transfer Tutorial
- 4Media iPhone Ringtone Maker for Mac Tutorial
- 4Media iPhone Max Guide
iPad Guides
Youtube/Online Video Guides
- 4Media Online Video Converter for Mac Guide
- 4Media Online Video Downloader for Mac Guide
- 4Media Online Video Converter Guide
- 4Media Online Video Downloader Guide
PPT/PDF Guides
Others
Articles
- How to download YouTube videos for free
- How to download/convert YouTube videos to iPod
- How to download and convert YouTube videos
- All features of apple iPhone
- Now you can get more TV offerings from Apple iTunes
- Video Streamer HAVA from Snappy Multimedia
- iPod Growth Driving Demand for Flash Memory
- MediaMan HVX-3500 Review
- Uncertain whether new iPod will be delayed or not because of hurdles
- T3's top five iPod alternatives
- Envivio Exhibits MPEG-4 Solutions from Mobile to HD at CCBN2006

